| Fightstick Boards & Encoders from Xin-Mo Co.,Ltd. | |
|
|
|
[Home] [Wireless Controller] [Single Controller] [Single with LED Controller] [Dual Controller] [HID Encoder] |
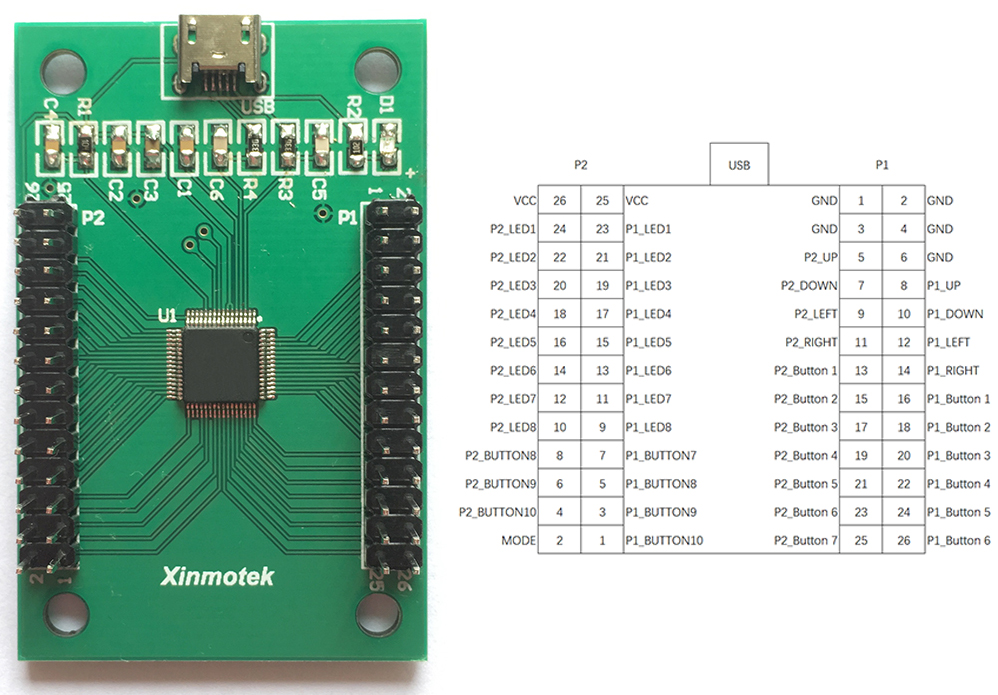
Product Name: PS3/PC Dual Player Controller with LED Type ID: XM-11 Release date: 06-01-2018 Retail link: Click here Wholesale MOQ: 120 Shipping: DHL
Features:
Every player's button 1 to 8 each has a corresponding LED indicating their status. Every player's button 1-8 LED effect can be configured to the following 4 states. The default state is that all the LEDs are disabled.
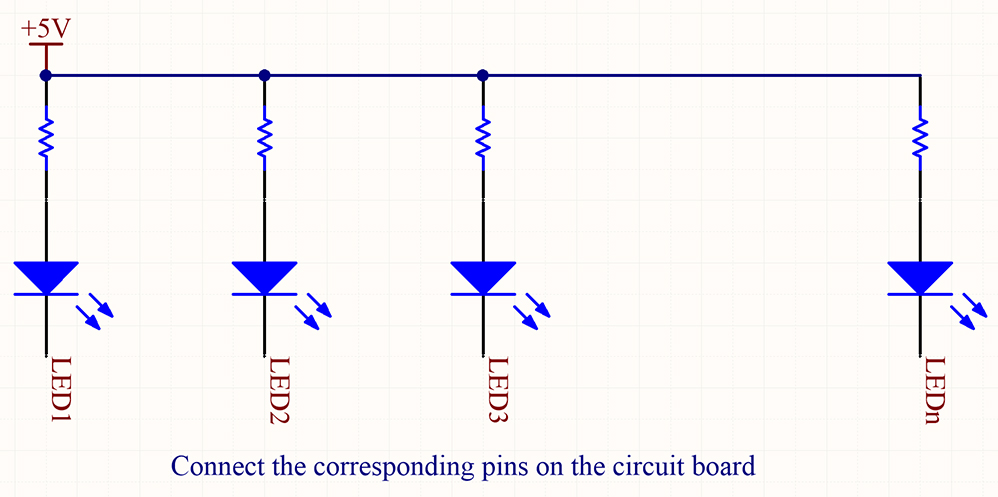
Use the joystick's UP + Mode button to switch through the above modes. When all the buttons have not been pressed for more than 6 minutes, all LEDs show a breathing effect. The LED effects and Mode configuration are stored internally. Next time plug in will read these configuration first, No need to reconfigure. Please note: The LEDs use a common anode connection. The LED is a diode, so the pins have the difference between positive and negative electrodes. If the pins are reversed, it will not light.
Why the 2nd player of XM-11 can't work on the Raspberry Pi? How to wiring? (1) First, the LED pins are divided into positive and negative. You need to distinguish them first. Because LED is a kind of diode, it won't light up when reversed. (2) Second, you have 2 * 8 red wires. Make sure that one end is connected to the VCC pin of the board and the other end is connected to the positive pins of the LEDs. (3) Third, using 4PIN wires, connect the negative pins of the LEDs to the position marked LED1, LED2, LED3... on the board. (4) At this step, the wiring is finished. You can use USB cable connecting the board to a PC and press the button. If no LED lights up, please use UP + MODE to switch to the mode you want.
Last update: 10-May-2023 15:56 |
2009-2018 xin-mo.com, xinmotek.com. All products and websites designed by Jerry Yu(cnjerryu@gmail.com). |